
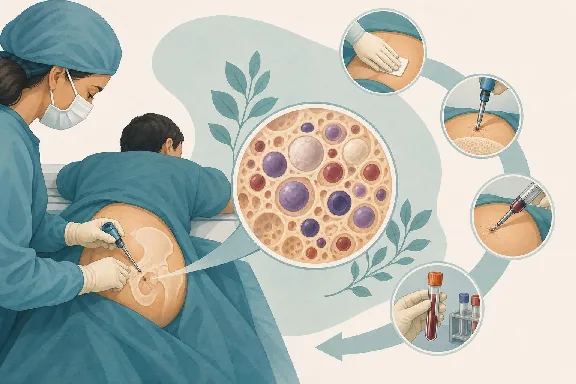
Reduce anxiety by learning exactly what to expect step by step during a bone marrow test procedure, from modern sedation options to the quick recovery.
Few medical procedures carry as much anxiety as a bone marrow test. The name alone sounds intimidating, and most people have heard at least one horror story from a friend or family member. But here’s the truth: modern bone marrow procedures in 2026 are far more manageable than most patients expect. The sedation options are better, the needles are more refined, and the whole process typically takes less than 30 minutes. If your doctor has recommended this test, understanding what happens during a bone marrow test procedure – and what to expect at each step – can take a significant amount of fear out of the equation. Knowing the timeline, the sensations, and the recovery process puts you back in control. This isn’t a vague overview. It’s a practical, honest walkthrough of every phase, from preparation through results, so you can walk into that appointment with realistic expectations instead of dread.
Understanding Bone Marrow Aspiration and Biopsy
Bone marrow is the soft, spongy tissue inside your larger bones, and it’s where your body manufactures blood cells: red cells, white cells, and platelets. When something goes wrong with blood cell production, a bone marrow test gives doctors a direct look at the source. No blood draw from your arm can provide the same level of detail.
Why Doctors Order Bone Marrow Tests
Doctors typically order this test when blood work shows persistent abnormalities that can’t be explained by simpler causes. Common reasons include unexplained anemia, abnormally high or low white blood cell counts, suspected leukemia or lymphoma, and monitoring the progression of known blood disorders. If you’re undergoing chemotherapy, your oncologist may also use bone marrow testing to check whether treatment is working. The test isn’t ordered casually. If your doctor is recommending it, they’ve usually already ruled out less invasive explanations.
The Difference Between Aspiration and Biopsy
These two procedures are often performed together during the same appointment, but they collect different types of samples. An aspiration uses a hollow needle to withdraw liquid marrow, which allows the lab to examine individual cells under a microscope. A biopsy removes a small core of solid bone and marrow tissue, preserving the structure so pathologists can see how cells are arranged within the bone. Think of aspiration as taking a water sample from a lake, while biopsy is pulling up a core of the lakebed itself. Together, they give the most complete picture.
Preparing for Your Procedure
Preparation is straightforward, but a few details matter more than you might expect. Getting these right helps the procedure go smoothly and reduces your risk of complications.
Medical History and Medication Review
Your care team will ask about all medications you’re currently taking, with particular attention to blood thinners like warfarin, aspirin, and newer anticoagulants such as apixaban or rivarelbant. You may need to stop certain medications several days before the procedure. Be upfront about supplements too: fish oil, vitamin E, and some herbal products can affect clotting. If you have a bleeding disorder or have ever had a bad reaction to local anesthesia, mention it during this review. Don’t assume your doctor already knows everything in your chart.
Sedation Options and Fasting Requirements
Most bone marrow procedures are done with local anesthesia alone, meaning the area is numbed but you stay fully awake. However, many centers now offer conscious sedation (a mild IV sedative that keeps you relaxed but responsive) for patients who are particularly anxious. If you opt for sedation, you’ll typically need to fast for 6 to 8 hours beforehand. If you’re only getting local anesthesia, fasting usually isn’t required, though your facility may have its own guidelines. Ask about sedation options during your pre-procedure consultation. There’s no shame in requesting it, and it can make a real difference in your experience.
Step-by-Step Breakdown of the Procedure
This is the part most people want to know about, and honest information is more useful than reassurance. Here’s what actually happens during a bone marrow procedure, step by step.
Positioning and Local Anesthesia
You’ll typically lie on your stomach or on your side. The most common collection site is the posterior iliac crest, which is the large bone at the back of your pelvis, just above the buttock. Your doctor will feel for the correct landmark, then clean the area thoroughly with an antiseptic solution.
Next comes the local anesthetic, usually lidocaine. You’ll feel a sharp sting and brief burning sensation as the numbing agent is injected into the skin, then deeper into the tissue covering the bone (the periosteum). This deeper injection can be uncomfortable, but it only lasts a few seconds. The doctor will wait a couple of minutes for the anesthetic to take full effect before proceeding.
The Collection Process
For the aspiration, the doctor inserts a special hollow needle through the numbed skin and into the bone. Once the needle reaches the marrow cavity, a syringe is attached and a small amount of liquid marrow is drawn out. This is the moment most patients remember, because the suction creates a distinctive deep pulling or aching sensation that the local anesthetic can’t fully block. It’s brief, typically lasting only 5 to 10 seconds per draw.
If a biopsy is also being performed, a slightly different needle is used to extract a tiny cylinder of bone and marrow tissue. The doctor rotates the needle to separate the core sample. This part involves pressure and a sense of twisting, but the sharp pain is usually minimal if the area has been well numbed. The entire collection process, both aspiration and biopsy combined, generally takes 10 to 15 minutes.
What the Sensation Feels Like
People describe the aspiration pull differently. Some say it feels like a deep cramp in the hip. Others compare it to a sudden, intense pressure that radiates briefly down the leg. The sensation is genuinely uncomfortable, but it’s also genuinely short. The biopsy portion feels more like sustained pressure and grinding rather than sharp pain.
Here’s what nobody tells you: the anticipation is almost always worse than the actual event. Most patients report afterward that it was "not as bad as I expected." That said, everyone’s pain tolerance is different, and it’s completely normal to feel anxious. Communicating with your doctor during the procedure helps. They can pause, adjust, or add more local anesthetic if needed.
Immediate Post-Procedure Care
The procedure itself is quick, but what happens in the first 24 to 48 hours afterward matters for healing and comfort.
Recovery Room Monitoring
After the needle is removed, firm pressure is applied to the site for several minutes to control bleeding. A pressure bandage is placed over the area. If you received conscious sedation, you’ll be monitored in a recovery area for 30 to 60 minutes until the sedative wears off. Your vitals will be checked, and you’ll need someone to drive you home. If you only had local anesthesia, you may be able to leave within 15 to 20 minutes, once the staff confirms the bleeding has stopped.
At-Home Wound Care and Activity Restrictions
Keep the pressure bandage dry and in place for at least 24 hours. After removing it, a simple adhesive bandage is usually sufficient. Avoid soaking the area in baths, pools, or hot tubs for about 48 hours.
For the first day or two:
- Avoid strenuous exercise, heavy lifting, or activities that strain the pelvis
- Sleep on your back or on the opposite side to avoid pressure on the biopsy site
- Take acetaminophen (Tylenol) for soreness; avoid aspirin or ibuprofen unless your doctor approves, as these can increase bleeding risk
- Apply an ice pack wrapped in a cloth for 15 to 20 minutes at a time to reduce swelling
Most people feel sore at the site for 3 to 5 days. Some experience soreness for up to a week. You can usually return to work and normal activities within a day or two, depending on your job’s physical demands.
Managing Potential Side Effects and Risks
Bone marrow procedures are considered low-risk, but complications can occur. The most common issue is prolonged soreness or bruising at the biopsy site, which typically resolves on its own. Minor bleeding or oozing from the site in the first few hours is normal.
Serious complications are rare but include infection at the puncture site, excessive bleeding (more common in patients with low platelet counts or clotting disorders), and, very rarely, damage to nearby structures. Call your doctor if you notice increasing redness, warmth, or swelling around the site; fever above 101°F (38.3°C); bleeding that soaks through your bandage and doesn’t stop with firm pressure; or numbness or tingling in your leg that doesn’t resolve.
The infection rate for bone marrow biopsies is estimated at less than 0.1%, making it one of the safer invasive procedures in hematology. Patients taking immunosuppressive medications or those with compromised immune systems should discuss their specific risk profile with their care team beforehand.
Understanding Your Results and Timeline
Waiting for results is often the hardest part of the entire experience. Knowing what’s happening behind the scenes can make the wait more bearable.
How Samples Are Analyzed in the Lab
Your marrow samples go through several types of analysis. A hematopathologist examines the cells under a microscope, looking at cell types, maturity, proportions, and any abnormal features. Flow cytometry may be used to identify specific proteins on cell surfaces, which helps classify blood cancers. Cytogenetic testing checks for chromosome abnormalities, and molecular testing can detect specific gene mutations relevant to diagnosis or treatment planning. Each of these tests has its own processing time, which is why results don’t come back overnight.
When to Expect Your Final Report
Preliminary results from the microscopic examination are sometimes available within 2 to 3 business days. However, the complete report, including cytogenetics and molecular studies, can take 1 to 3 weeks. Chromosome cultures, in particular, need time to grow before they can be analyzed.
Your hematologist or oncologist will typically schedule a follow-up appointment to review results with you in person. If preliminary findings reveal something urgent, you’ll usually hear from your doctor’s office sooner. Don’t hesitate to call and ask about the timeline if you haven’t heard anything. Knowing your expected wait window reduces unnecessary anxiety.
Moving Forward With Confidence
A bone marrow test can feel like a big deal, and emotionally, it is. But physically, the procedure is brief, well-tolerated by most patients, and carries minimal risk. The discomfort is real but temporary, and modern sedation options have made it much more manageable than it was even a decade ago.
The most useful thing you can do before your appointment is ask questions. Confirm your sedation options, clarify which medications to stop, and make sure you have a ride home if sedation is involved. Bring a list of your current medications to the appointment, and don’t be afraid to tell your doctor during the procedure if you need a pause or more numbing.
Whatever your results reveal, getting this test done is a step toward answers. And answers, even difficult ones, are always better than uncertainty. If you’re preparing for a bone marrow biopsy, you now know what each step involves, and that knowledge is genuinely your best tool for getting through it.